
If you are an artist with a website, chances are you are going to work with images. These may be photos you’ve taken, photos or your work in other mediums, like paintings, or even photos of you performing.
There are a couple of things you can do with your images (yes, all of your images) when you put them on your website that will ensure a good experience for your users, a fast-loading website and fantastic looking samples of your work. These steps aren’t difficult, so hang in there. We might even have some fun.
Your Images Need to Be Small
If you want your website to load quickly for your visitors (and believe me, you do), it’s important that the images you use are sized correctly for the web. If you take a photo of your latest sculpture in stunning hi-definition and then throw that directly onto your site, your visitors are going to watch that photo load on their screens bit by bit. Bar by bar. Like it’s 1996. More likely, they’ll just leave.
Image size is increasingly important as more and more users are viewing your website on their smartphone. The bigger your images, the more of your visitors’ precious data you are demanding.
Our own stats show that last year about 36% our website visitors came from mobile devices. That’s a significant number.
If you are putting images into emails you send your patrons, those mobile numbers go WAY up. Image size then becomes critical, because if your images are too large your email might not even get delivered or received. Yikes.
So we know our images should be small. But ‘size’ is deceiving here.
Your Images Need to Be Big
We’re talking about file size, not dimensional size. Your images don’t need to be tiny one-inch squares littering the page. In fact, a few well chosen HUGE images are better in most cases. Images that span the entire website, like the image at the top of this blog post. The trick is getting images that big without the file size ballooning.
Enter compression.
File compression takes some parts of the image data and throws it away, leaving it up to an image view (like a web browser) to ‘connect the dots’ between the pixels (blocks of colour) left and the empty space. At least, I think that’s how this all works.
What you need to know is that the more an image is compressed, the worse it looks and the smaller the file size gets. The dimensions of an image do not change when you compress it. The file size and image quality do.
Balancing Size and Quality
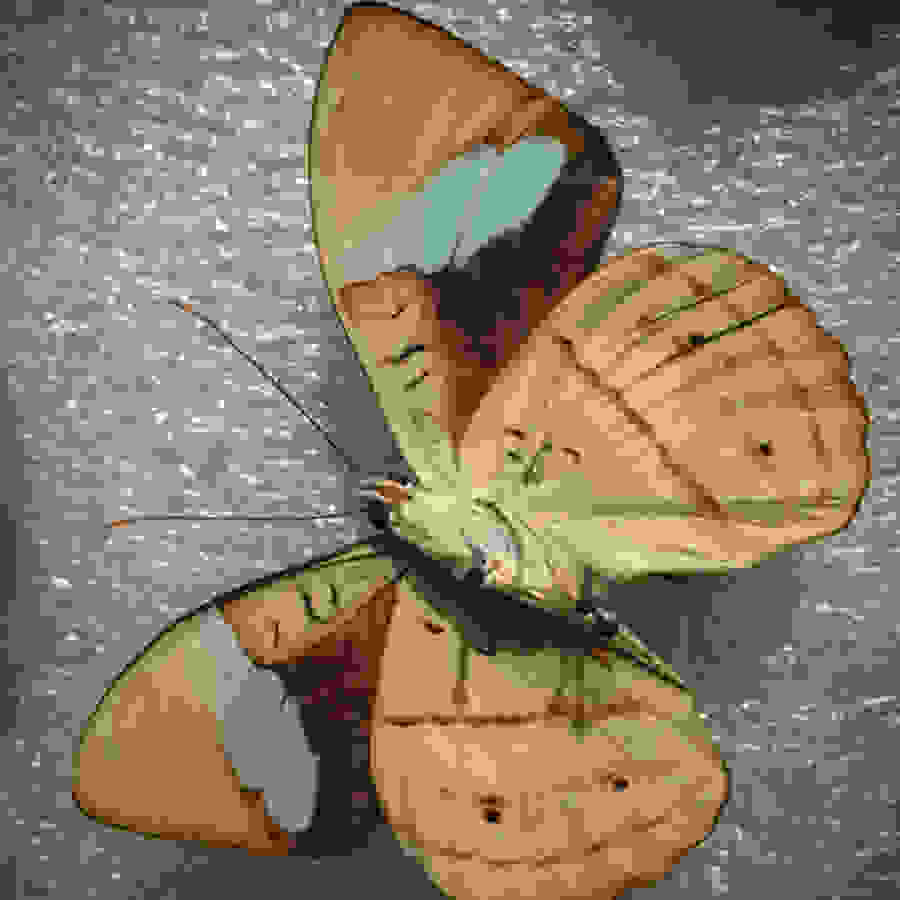
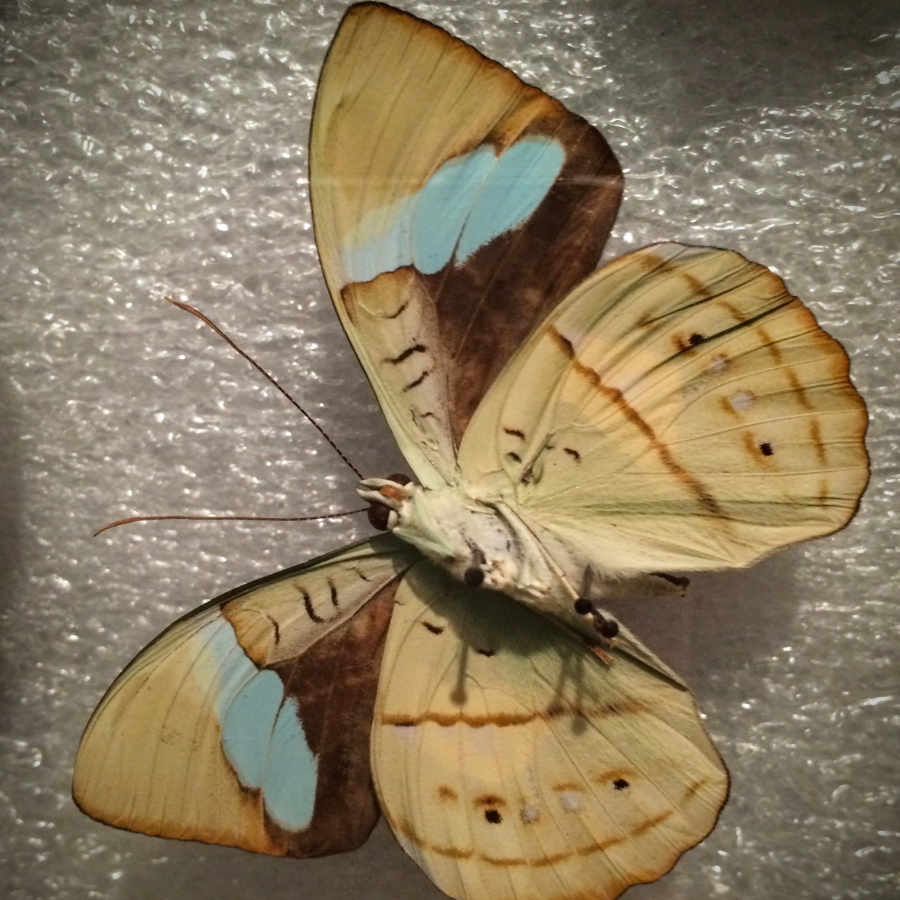
Let’s take a sample image. Here is an image I shot recently of a butterfly at the Royal Alberta Museum. I’ll show you what it looks like at the same dimensions but at smaller and smaller sizes, using JPEG compression.
'Best Quality’ - 739KB - 900 pixels wide by 900 pixels high

'High Quality’ - 175KB - 900 pixels wide by 900 pixels high

‘Medium Quality’ - 86KB - 900 pixels wide by 900 pixels high
‘Low Quality’ - 42KB - 900 pixels wide by 900 pixels high

Quality setting at 1 out of 100 (1%) - 28KB - 900 pixels wide by 900 pixels high

You’ll notice that the quality is fairly similar until we dip below the ‘Medium’ setting in the software I was using. Then things go south fast and our butterfly looks like art from a 1987 Nintendo game.
The file size is still acceptible at Medium, and even High in this case, so I’d likely choose High.
You may have also noticed that the file size of the ‘Best Quality’ version is 9X that of the 'Medium Quality' Version! When you add that difference up across all of the images on your website, you are talking about significant savings on bandwidth, faster load times and lower data use for your users.
Right Tools for the Job
Thankfully there is a TON of computer software available to do image resizing for you.
Here are some tools I recommend for different uses.
The Beautifully Simple: Squarespace / Wordpress
Before you read any further, I have good news for you. Many online website builders will resize your images for you as you upload them! Automatically! So you can throw a batch of images at your website’s image uploader and it will take care of the various sizes you may need.
Squarespace does this in the background, seamlessly, and serves up different sizes of your image depending on the size of your visitors web browser. A cell phone user will get a small version and a 27” iMac user will get a huge version, automatically compressed with a good balance between file size and quality. Because it is automatic, you really get no customization options here, but I’ve been happy with the simplicity of the Squarespace approach and use it on this website almost every day.<>Wordpress takes a different approach. Your full-size version is maintained, and three other versions are created at different sizes (both file size and dimensions) are quality. This is great in that you get a choice of different versions to use or provide your users. It is more complicated than Squarespace though and doesn’t serve up different versions based on your visitors by default.
With both of these options, there is a hitch. Big images still take forever to upload. That means that if you are uploading 100 photos of your work and you haven’t resized them for the web, prepare to wait a long time before these site building tools can even access your files to work their magic.
The Power Tools: Adobe Photoshop / Affinity Photo / GIMP
These are all professional image editing apps. They will all do a thousand and one things more than you need if you are just looking to resize a photo, but they come in handy if you already own them, and they offer the finest level of control over your images available.
Photoshop is the oldest and most expensive of this bunch. It now uses a subscription model which means you cannot buy the program outright, but must pay for it every month. This costs less upfront but more in the long term if, like me, you don’t upgrade often. Photoshop is available for all major platforms and used by everyone in the design world. Really, every last person.
Photoshop has a ‘Save for Web’ feature hidden in it’s File menu that I’ve used hundreds of times over the years. This allows you to see, side by side, what your original image looks like and what the new, compressed version will look like once the compressor has had its way. It’s an excellent tool.

Affinity Designer is what I use today, because it does a huge portion of what Photoshop does, works much faster in my experience and costs much, much less (around $50 once). Affinity Designer has a similar tool to save images for the web called Export (also under the file menu). Affinity Designer is what I used to process the butterfly images above. While I highly recommend the program, it is more difficult to use than beginner software, does way more than many people need and is only available on Mac.
GIMP is essentially an open-source version of photoshop. It is fairly ugly out of the box so I haven’t used it much. It is free, though, and it runs on everything. I’m quite sure it would offer similar ’save for web’ functionality.
These tools often offer ‘batch processing’ too, which can take care of dozens of images at once with the click of a button. However, it can be hard to figure the function out.
The Swiss Army Knife: Teeny Tokyo, IceCream and More
There are apps out there that do just one thing very well. Image Resizer apps fall into this category, and usually allow you to drop a folder full of images onto the app or icon and have them magically come out compressed to the settings of your choosing.
I won’t make an exhaustive list of these, but IceCream Image Resizer (free) looks great for Windows, and Teeny Tokyo for Mac ($4.99) looks awesome, too.
When I need to process a large group of images fast, I go this route.
Some Sneaky Tricks
There are many, many ways to resize images other than what I’ve covered here. These are just some of my favourites.
Apple’s Mail app will resize images for you when you want to send them to someone else. You can even choose from a few quality settings. <>So next time you want to resize some images, if you are on a Mac, fire up a new email, then drop those images into the message. You’ll be asked to choose a quality level. If you choose anything less than ‘full’, the images will be compressed. With that work done, don’t send the email. Just drag those compressed images from the email back onto your desktop or into a folder and viola!
Social Media
Ok, this is not the best option, but I have used it in a pinch. Upload a photo privately to your social media account (like a private facebook album), then drag the image back to your computer (or right-click and choose ‘save as’). Social media sites automatically compress your images when you upload them.<>Again, if you find yourself doing this often, switch to one of the better options above and save yourself some stress.
Preview

Apple’s built-in image and PDF viewer, Preview can actually resize and export compressed images. Just open the image up in Preview and choose 'File/Export’ to view a list of compression options. If you want to change image dimensions, head to the ‘Tools’ menu and ‘Adjust Size’. You’ll get a bevy of good options there, including the ability to change the resolution (a smaller resolution means a smaller file size). Screen resolution is usually set to 72, print to 300. Beyond that, don’t think too hard about it :)
Questions?
If this is your first time reading about image sizing for the web, you may have more questions than answers. It’s all good. Simply ask away in the comment form below, I’ll be notified, and come back here to answer your questions as best I can so we can all benefit from shared learning.
Now get shrinking!